French plats
Step by step
·
I Sectioned the top piece of my hair then start
of as if I was doing an ordinary three
strand plat
·
I Kept the strands of hair separate but then swapped
them over to the other side
·
I Started taking smaller strands of hair and
take it over to the other side
 ·
Then I took the strand of hair I just added and
took it over to the middle do the same to the other side
·
Then I took the strand of hair I just added and
took it over to the middle do the same to the other side
·
I then took the left over strands of hair and
brought them to the middle making sure I was pulling the hair tightly so the
plat was more secure
·
I kept repeating the process until it went to a
basic plat then secured with a hair tie.
I I found this technique quite hard and it took awhile for me to get the grasp of it but in the end I knew how to do it. When I do this look again the things I will take into consideration are the size of my sections to make it appear more even and I will make sure its more center as my outcome looks quite slanted although I'm pleased with the outcome as I've never attempted a French platt before.

Fish tail platts
Step by step
·
First I tied my models hair into a side pony
tail
·
Sectioned the pony tail into two parts
·
I then pulled one section of hair from one of
the two parts over to the other side and then did the same to the other side
·
Then I kept over lapping hair from the other
sides adding more strands as I went on
·
I kept that process going until I had no hair
left then tied with a hair tie.

At first I found this technique tricky but after trying it again and again and not over thinking I succeeded in creating a fish tail platt which I a pleased with the results. Things that I would take into consideration while doing this again is to take the same sized sections of hair to make it more symmetrical and to also tighten my grip while doing it so it looks tighter and neater.
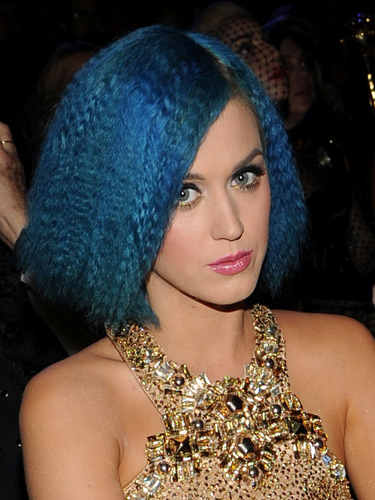
Fish tale platts have also become modern and fashionable with some of the most iconic trend setting famous people wearing them.
I especially love Rihannas version as the red hair sends it back to the Elizabethan era although its a vibrant red which isnt a natural colour I feel it adds more effect to the modern aspect of it all,
http://style.mtv.com/wp-content/uploads/2010/11/fishtail-braids.jpg

Adding ribbon
While
creating the fish tail like I did for the step by step on the previous piece of
paper you do the same process but adding the piece of ribbon as you go along
threading it throughout the hair crossing them over. I found this quite
difficult to manage although I feel it is effective
 Im really pleased with this as the first test run for my design I feel my partner did really well in portraying what I wanted Only few aspects I feel that needed to be perfected more are making sure the mow hawk part is equal each side and that the french platt is more secure as some parts were falling out but for the first time going through it I'm more that happy just realise now that there are a few things to touch up on for the final timed assessment.


 for this I was thinking about creating a padded round shape for the front with plats coming front the front going over the padded hair and leading off into the back I wanted to do a three strand platt look at the front but after alot of consideration I feel that I can expand and create a more interesting and exciting look for my final design although I still do like the idea of this design

 I was really inspired by Chanels catwalk by the hair stylist

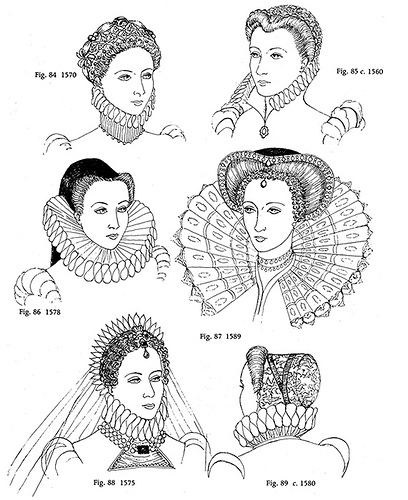


 As you can see from this portrait of Elizabeth her hair has a slight wave/crimp to it and it is but up into a heart shape in comparison to the modern versions above with their hair down as in Elizabethan times hair down would indicate your a virgin 'pure' on the 15th of january 1559 Queen Elizabeth's coronation took place with her hair long and wavey/crimped down still off the face emphasizing the forehead.


